![]()
![]()
The Optics Laboratory
Group of
Hans Hallen, North Carolina State University Physics Department![]()
![]()
![]()
The Optics Laboratory
Group of
Hans Hallen, North Carolina State University Physics Department![]()
The Probe
•
• Fabrication -- Heat and Pull
• Fabrication -- Etch
• Fabrication -- Metal Coating
• Throughput
• Thermal Loading
• New Ideas
Optical Properties, Theoretical
•
Early NSOM Efforts•
L. Novotny, D.W. Pohl, P. Regli, Ultramicroscopy 57, 180-8 (1995).•
Douglas A. Christensen, Ultramicroscopy 57, 189-95 (1995).
• A perfectly conducting plane with a hole.
• H.A. Bethe, Physical Review, 66, 163-182 (1944).
• C.J. Bouwkamp, Phillips Res. Rep. 5, 401 (1950).
- Does a remarkable good job as observed in single molecule and our Raman studies.
• A recent review
• D. Barchiesi et al. Phys. Rev. E54 (4) pt B, 4285-92 (1996).
• An interesting point:
• L. Novotny, D.W. Pohl, B. Hecht, Ultramicr. 61 (1-4) 1-9 (1995).
• L. Novotny, D.W. Pohl, B. Hecht, Opt. Lett. 20 (9) 970-2 (1995).
- Polarized light through an aperture has two spots of maximal electric field intensity.
- Polarized light through a (thinly) covered point has just one maxima, under the point.
Optical Properties, Experimental
Why do we coat the probe tip with metal?
• To contain the light.
• The modes do not remain localized to the dielectric core when it gets small.
• M.A. Paesler and P.J. Moyer, "Near-Field Optics: Theory, Instrumentation and Applications," (Wiley, New York, 1996).
How well does the metal confine the light?
• It depends upon the metal.
• The light intensity falls exponentially into the metal, scaled by the penetration depth.
• Aluminum is best at visible frequencies.
• The minimum confined size for green light is ~10 nm.
• E. Betzig, et al, Science, 251, 1468-1470 (1991).
How do we inspect the probes?
• A point source Abbe pattern should be observed under a good optical microscope for both coated and uncoated fibers, otherwise throw the tip out.
•
Scanning electron microscopy - field emission e-gun for resolution - no conductive coating needed for tips - view aperture/shape at different angles
Fabrication of the Tapered Fiber Probe (Heat and Pull)
• B.I. Yakobson, P.J. Moyer, M.A. Paesler, "Kinetic limits for sensing tip morphology in near-field scanning optical microscopes," J. Appl. Phys 73 (11) 7984-6 (1993).
• G.A. Valaskovic, M. Holton, G.H. Morrison, "Parameter control, characterization, and optimization in the fabrication of optical fiber near-field probes," Appl. Opt. 34 (7) 1215 (1995).
• R.L. Williamson, M.J. Miles, J. Appl. Phys. 80 (a) 4804-12 (1996).
• Mufei Xiao et al, "Fabrication of Probe Tips for Reflection SNOM: Chemical Etch and Heating Pulling Methods," J. Vac. Sci. Tech. B15 (4) 1516 (1997).
•
Heat with a CO2 laser until the fiber begins to soften.
• Then pull hard (solenoid). 
•
Heating power, timing, and pulling force are adjusted to give the desired tip shape.![]()
•
The tip is coated with Aluminum while rotating.• Inspection verifies lack of pinholes on shank
and presence of hole at tip (optical microscope).
• Tip taper angle studied with optical or electron (SEM) microscopy.
• In practice, a commercial tip puller is used.
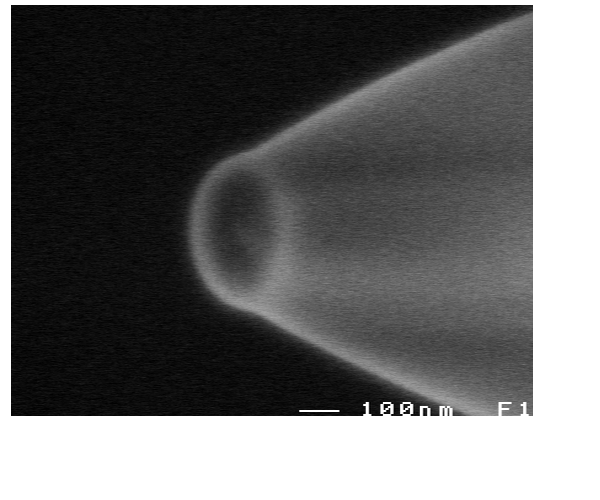
An uncoated pulled (large to see details) tip:
•
Note the flat cleaved end which will define the aperture (up to diffusion of the evaporant metal).
Etching the fibers:
•
• Basic (ammonium flouride) solutions give smooth surfaces.
• Organic layers floating on the etchant use surface tension to provide controlled angle of the taper (30° for isooctane).
• P. Hoffmann, B. Dutoit, and R.-P. Salathé, Ultramicroscopy 61, 165 (1995).
• Etching based on properties of the core: S. Monobe and M Ohtsu, J. Lightwave Technol, 14 (10) 2231-5 (1996).
Advantages
• High Throughput
• Reproducible Shape
Disadvantages
• Hard to get a well-defined aperture (no flat cleave as in heat&pull method)
Coating the fibers:
•
Standard technology.
• Probe must be rotated -- usually a home-made holder.
• Material
- Aluminum is best in the visible.
• Thickness
- greater than a penetration depth.
- maximum set by film stability and by size of the probe.
- not critical.
- different than what the crystal monitor says due to rotation (~
p lower) and angle (cos q).
Coating the Probe with Aluminum
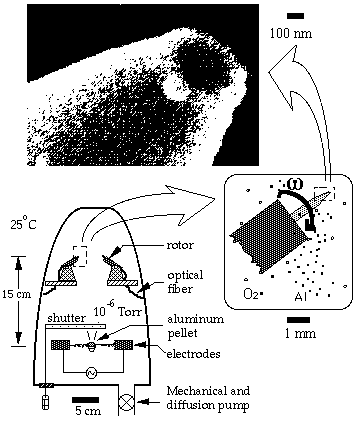
A coated probe (again large so the cleave/ aperture
are readily visible):
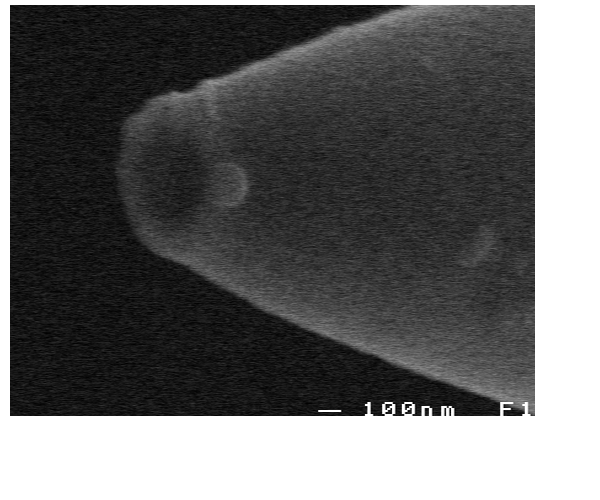
Coating Problem: Aluminum Diffusion
• Polarization is effected by the lumps.
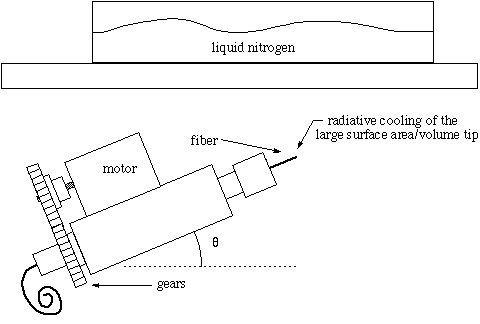
Solution -- Cool the Probe (Hallen Lab)
Radiation + Conduction
The Throughput Problem (Pulled fiber tips):
How important is spatial resolution to you?
•
It is very expensive in signal intensity.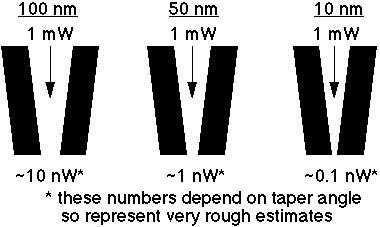
•
Recall that one cannot arbitrarily increase the input power.• Often one does not need the highest spatial resolution to take advantage of NSOM.
Other types of 'resolution'
• Spectroscopic (cm-1)
• Polarization (°)
• These need high signal to noise so compete with spatial resolution.
Throughput Considerations:
•
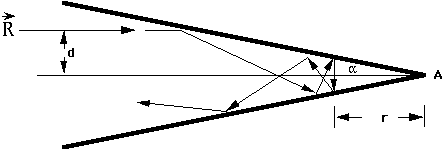
Modeling for linear sections: idea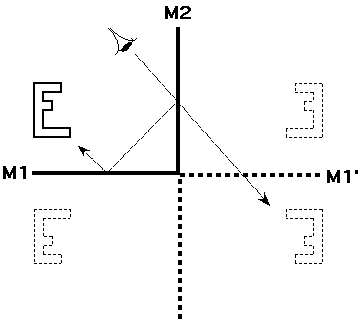
B.I. Yakobson and M.A. Paesler, "Tip optics for illumination NSOM: Extended zone approach," Ultramicroscopy 57, 204 (1995).
R = fiber radius,
f = taper angle, q = critical angle, r = tip aperture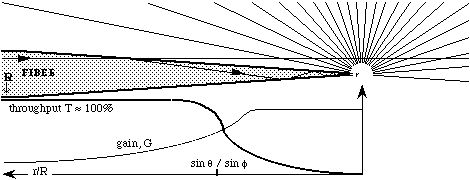
•
The optical intensity decreases exponentially beyond (closer to tip than) cut-off, with length scale dependent upon geometry and material.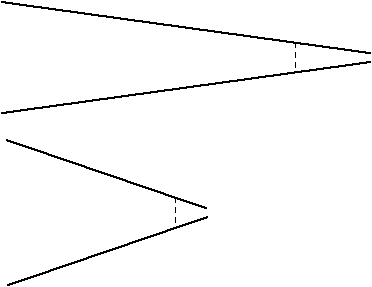
Damage of the probe:
•
Probe shape
(a)
Before Damage
(b)
After Damage
(c)
A Model
(d)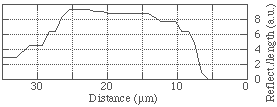
•
Theory comes from ray tracing (count bounces/length):P.O. Boykin, M.A. Paesler, B.I. Yakobson, "Energy Dissipation in NSOM Probe
Fiber Tapers: Ray Tracing Assessment," SPIE Proceedings 2677, 148-153 (1996).
Tip Heating:
• Due to imperfect reflections from the metal coating.
• Be careful if you are not using Aluminum.
• Results in metal diffusion to lumps and scattering loss of light (destroyed probe).
• Measures of thermal time constant, models of probe temperature and profile, and thermal expansion of probe: A. LaRosa, B. I. Yakobson, and H.D. Hallen, APL 67, (18), 2597-2599 (1995).
•
Temperature profile from external Al reflectance D.I. Karaldjiev, R. Toledo-Crow and M. Vaez-Iravani, APL 67 (19) 2771-3 (1995).
• Temperature profile from 'STM Thermocouple' M. Stahelin et al, APL 68 (19) 2603-5 (1996).
The experimental method
: A. LaRosa, B. I. Yakobson, and H.D. Hallen, "Origins and effects of thermal processes in near-field optical probes," APL 67, (18), 2597-2599 (1995).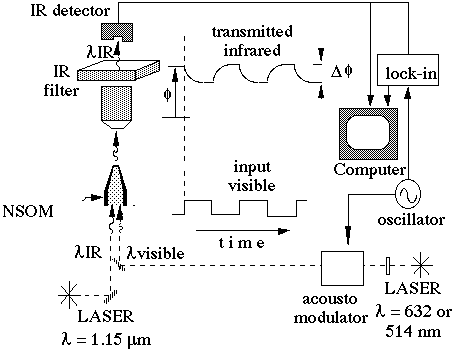
•
• Detect with a CW IR laser.
Measurements of the probe time constants:
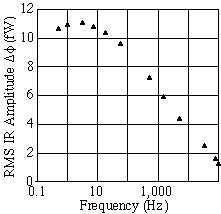
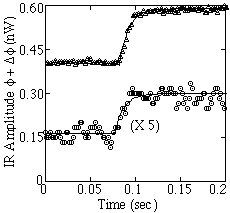
•
slender probe with a 180 nm thick Al coating•
2 mW red light, 1 mW of CW IR input• triangles (after) and circles (before damage)
•
0.23 and 0.026 nW pk-pk Df•
10.3 and 10.1 msec time constants• Independent of details of probe shape.
• Model suggests that several hundred microns
of the tip are heated above ambient
• Peak is tens of microns from the tip.
New Ideas, two ways to increase the throughput by ~1000X:
•
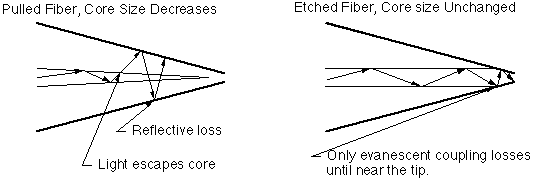
•
Let Total Internal Reflection Work When it Can • M.A. Paesler, H.D. Hallen, B.I. Yakobson, C.J. Jahncke, P.O. Boykin, and A. Meixner, "Near-field optical spectroscopy: enhancing the light budget," Microscopy and Microanalysis 3, 815 (1997).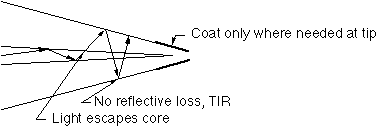
![]()
North Carolina State University | Physics | Optics Home
Last updated on September 27, 2000